How to install vinyl flooring

Installing vinyl flooring requires a special approach — a certain amount of knowledge is required. In the absence of skills, the result may not meet expectations. Vinyl flooring is a modern PVC floor that has nothing to do with inexpensive roll material. Vinyl today comes in an unprecedented variety, with wood and stone decors looking more authentic.
Features and main characteristics
When choosing a vinyl flooring for installation, the main points should be clarified:
- Easy to care for. For cleaning, it is enough to vacuum and wipe with a damp cloth;
- High strength. The coating does not deform if the recommendations for use are followed. Make sure that heavy furniture does not leave pressure points. Even with sharp stones under your shoes, you need to be careful. Otherwise, they may leave scratches. The different classes of use for vinyl flooring indicate which rooms the material is suitable for. The 23/32 class of use is the most common. It is suitable for all living spaces;
- Impressive durability. Vinyl flooring cannot compete with stone or wood floors for durability, but it does outperform almost all other floor coverings. With good care and not too much load, vinyl flooring can serve 15-20 years;
- Excellent sound insulation. Compared to laminate flooring, there is less walking noise as the vinyl flooring is more resilient;
- Moisture resistance. Hard vinyl is suitable even for the bathroom. But the level of protection is not enough for installation in damp rooms;
- Versatility. Almost all design ideas can be realized in production: from wood and stone decor to abstract patterns.
Tile-shaped vinyl flooring is very popular because it offers some advantages over the original: it is quicker and easier to install and provides better indoor sound insulation. Plus, it’s just as easy to clean and very stable. If you’re looking for a viable alternative to tiles, vinyl flooring is the way to go.
Types and features of vinyl flooring
First of all, vinyl flooring options can be divided into three types:
- Hardwood. Vinyl flooring offers greater stain resistance and durability than traditional natural wood flooring;
- Tiled. Consists of individual squares of different sizes that look like tiles when laid. One of the advantages of each tile is that it is easier to replace if damaged;
- Rolled. It usually has a width of 1.5 to 3.5 meters. Vinyl tile flooring limits the number of seams and is also great for high humidity areas like bathrooms and kitchens.
Vinyl is not always the same in composition — it is polyvinyl chloride, a type of PVC. It is only through additives such as plasticizers, fillers and stabilizers that the coating acquires its typical properties: it is elastic and very resistant to abrasion.
Table — Classification of vinyl flooring by type
| Name | Specifications | Feature |
|---|---|---|
| On the HDF beam | Thickness — up to 10 mm | Structured in the same way as laminate flooring. |
| Solid or full | Thickness — up to 5 mm | Designed for gluing, and a self-adhesive version is also provided. |
| Hard | Has an SPC base plate | Stone-plastic mixture makes the floor especially durable |
Preparatory work
While PVC roll products or design boards required a professional approach and many years of installation experience, manufacturers have developed flooring that is easy to install.
The click mechanism for vinyl flooring is borrowed from laminate flooring. Therefore, the first «click» vinyl floors were based on an HDF base plate. Thus, laying the flooring on its own was as easy as shelling pears. When, a few years later, a 5mm click-through full vinyl appeared instead of HDF beams, both professionals and consumers were pleasantly surprised: the installation of such a floor was a real breakthrough in the construction industry.
Unfortunately, too little attention is often devoted to the base. This is partly due to lack of awareness or savings. For vinyl flooring: the top floor is just as important as the base. Before laying vinyl flooring, be sure to ask about the underlay. Those who do not prepare the base run the risk that the function of the floor covering will be impaired. This can lead to consequential damages, which will be more costly than proper preparation of the subfloor.
Anyone who wants to install vinyl flooring correctly must follow the manufacturer’s recommendations, based on standards such as DIN 18365:
- the flatness of the base must be even (do not go beyond the permissible values);
- the subfloor should be thoroughly dried and checked for residual moisture;
- use the correct backing or insulation.
Not all old coverings can be used as a base. What matters is the smoothness of the surface and the level of moisture and hardness. If you do not take into account the recommendations for preparation, then the vinyl flooring will not last long.
Vinyl flooring installation methods
Depending on the type of covering the installation options are different:
On the glue
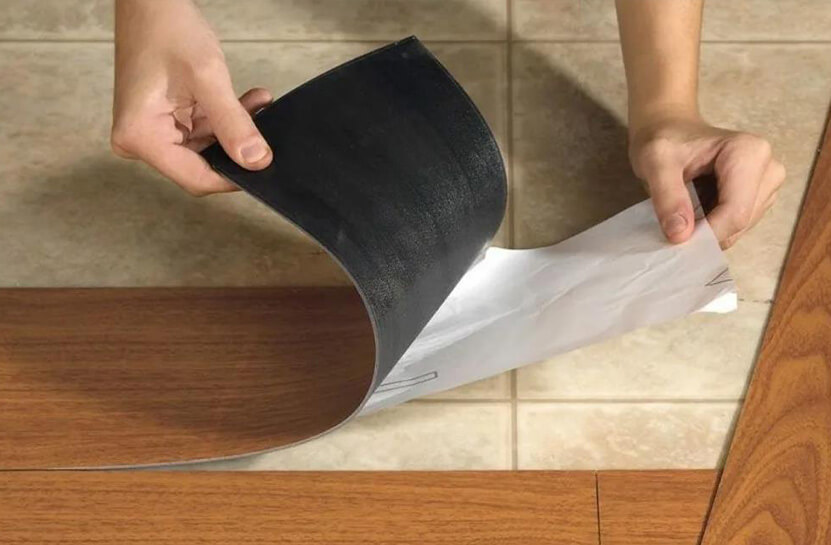
Whether it is PVC canvas, vinyl boards or sheets. This type of styling is especially appreciated by professionals. Bonding ensures speed and reliability. But in this case, professional knowledge and experience are required. As a rule, only glue boards with a thickness of no more than 3 mm are glued. It’s rarely needed to glue other types of vinyl. You can use a variety of methods and glue the vinyl dry. This uses, for example, a double-sided adhesive film. Advantage: It is easy to install and dismantle without leaving marks.
Lock connections
«Click» — vinyl is a simple solution. When laminate or hardwood flooring installtion, all the individual elements snap together. This means that the cover can be disassembled without damage at any time. In this case, there are various connections.

A universal option
This type of stacking combines gluing and click-method. It is suitable when a particularly fast vinyl flooring installation is required (especially on large areas). At the same time, insulation as a substrate has three functions at once: firstly, it separates the floor covering from the base, which provides a floating installation of adhesive vinyl; secondly, it provides additional sound insulation.

Selective side
An extremely easy way to install vinyl flooring, which is characterized by free laying of the covering with fixing of the edges. That is, the last board is fixed with a special tape. A non-slip backing is usually used. This type of installation is recommended for the short-term floor coverings with a quick restoration of the original surface (for example, when preparing temporary exhibition halls, etc.).
Self-adhesive plates
To install self-adhesive vinyl, the surface must be perfectly finished. This type of editing is not used in the professional area.
It is permissible to install covering on your own in a domestic environment. For vinyl flooring installation in buildings with high traffic, you cannot do without the help of professionals, as the quality requirements are increasing.
PVC-covering technology
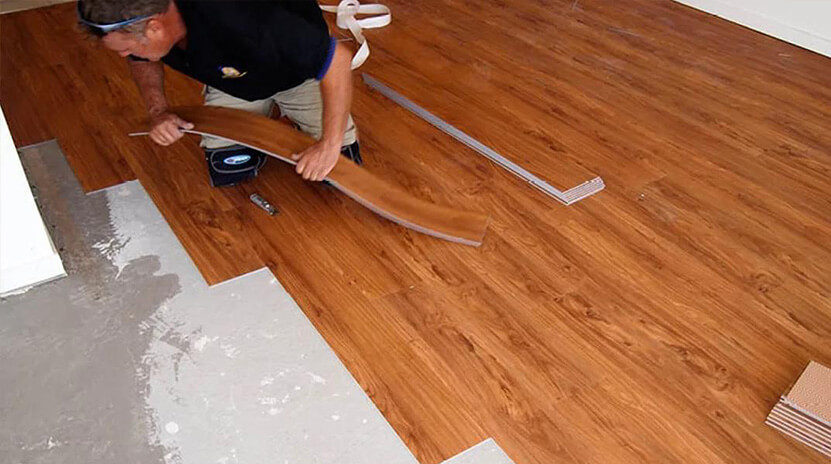
Once you have selected the right flooring and prepared the installation surface, you can start installing your vinyl floor. Compared to hardwood or laminate, the process will be faster and quieter. Most of the work is done with a cutter, not sawing. Plan your steps before you start installing vinyl flooring. It is best to work together.
1. Laying of plastic wrap and soundproofing
Soundproofing or plastic wrap is rolled all over the room. The tracks should overlap by 20 cm. The direction is irrelevant here. On the walls, allow the film or insulation to rise by about 0.5 cm. Seal the transitions completely with sealing tape so that moisture cannot pass.

2. Planning phase
Modern locks allow you to quickly, easily and almost seamlessly fix individual elements. The direction in the room — that is, the question of whether the floorboard is laid with or against the incidence of light — depends on taste. The reason for this is the locks, which lock almost seamlessly. In addition, the choice of a styling template also depends on the desire.

Whether to start laying on the left or right in the room is indicated by the manufacturer of the floor covering. All transverse seams, that is, the end faces of the boards, must be offset to the transverse seams in adjacent rows. This is the only way to get a strong connection. In some cases it is necessary to immediately shorten and / or cut the first floorboard in width in order to obtain the necessary “stability”.
3. Installation of the first row

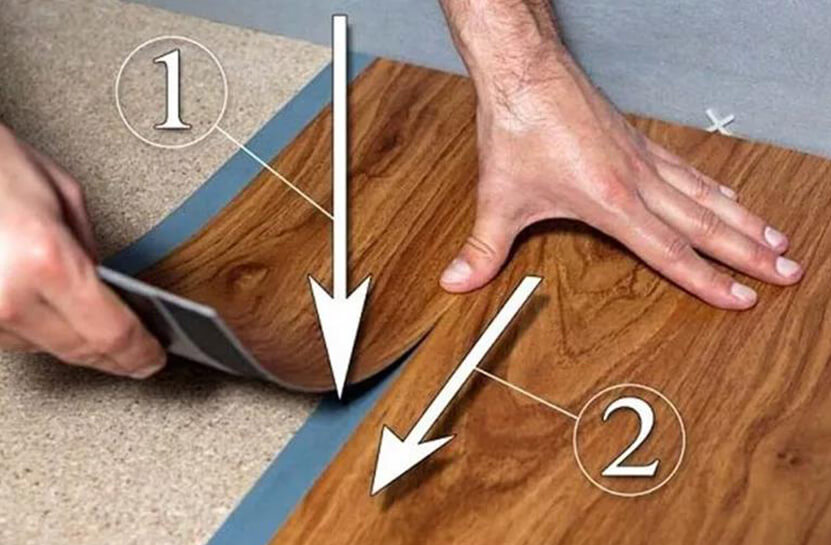
Accurate work in the 1st row is especially important because the 1st row sets the direction for the entire flooring. In the begining, level out any unevenness in the wall, which may occur even in new buildings, by cutting the floorboards along. To do this, draw a guide line with a pencil on the surface of the board, go through it with the cutter.
4. Application of extension joints
Do not lay the elements close to the wall, neither on the transverse nor on the longitudinal sides. The material can expand or contract due to fluctuations in temperature and humidity. This is possible due to the distance to the wall from the flooring, the so-called extension joint.

Use placement wedges to secure the extension seams. First, insert one or more installation wedges between the flooring and the wall on the narrow side. Also, place some wedges between the longitudinal side of the board and the wall. Insert the second element of the 1st row flush from the top and fold down until the lock clicks into place. According to this principle, lay the entire 1st row. When laying vinyl flooring in a tile format, the distribution of the wedges changes accordingly.
Note: Boards can be connected to each other in different ways, depending on the click system. Therefore, always refer to the manufacturer’s information.
5. Second row
Use the leftover piece from the previous row as the first plank of the next row. However, to do this, it must be at least 30 cm in length. Also position the first wedge of the 2nd row on the wall using the laying wedge and click on the longitudinal side.

Starting from the 2nd board, depending on the click system, fix the elements first on the longitudinal and then on the transverse side, or vice versa. Place the connections on top of each other and secure the elements with a light hit from above. In this way, lay the first three rows.
6. Laying the entire surface
Continue as you started from the front rows. To move faster, you need to lay two rows in parallel. It is important to observe the 30 cm seam offset in adjacent rows. Use an impact block to close the seams between the wedges. Finish laying the room the same day, if possible.

7. Heating pipes, door frames and corners
Draw small notches for corners or heating pipes with a pencil. Cut them out with a cutter or jigsaw. A reverse toothed disc is suitable for this. This allows the boards to be cut clearly from above without creating cracks on the visible side.

When laying vinyl flooring, the jigsaw is only used to cut corners. For corners, plan an extension seam and place a wedge between the floorboard and the wall. If the door frames are already installed, cut the material at the bottom, if possible, and place the floor underneath. To do this, first determine the size to be cut at the bottom of the structure: attach the flooring to the door frame and make a mark. It may also be necessary to trim the door.
If it is not possible to process the door frame, you will also need extension seams in these places. Since skirting boards are not installed here later, it becomes necessary to seal the seams with acrylic.
In new buildings, it is important to know with which direction of the stop the door is installed, and in which direction it opens. Finally, the boundary with the floor covering in the adjoining room should go exactly under the door leaf. A balancing profile can be used for the transition. When purchasing, make sure it matches the thickness of the adjacent flooring.
8. Finishing touch
The last elements are stacked in the usual order. When the installation of vinyl flooring is complete, the laying wedges can be removed. The main work has been completed. Now all you have to do is attach the skirting boards and maybe fill in some of the seams with acrylic.
Care considerations for vinyl floorings
Vinyl floors are very durable. But this does not mean that damage and deformation are completely excluded. That’s why simple care and maintenance guidelines should be followed to keep your vinyl floor looking good for decades:
- Vacuum and damp regularly. It may seem obvious, but cleaning is easy to forget because vinyl floors hide dirt well and look shiny. Regular cleaning and wiping will ensure a longer service life;
- Do not drag heavy furniture across the floor. f you need to move heavy kitchen utensils, dining tables or cabinets, be sure to lift them but not pull;
- Use mild detergents. When caring for vinyl flooring, use neutral and natural substrates. Harsh chemicals can degrade the protective top layer of the floor covering;
- Avoid hitting. To avoid serious defects that may arise during operation, it is recommended to install felt pads under heavy stationary devices and furniture legs.
. To avoid serious defects that may arise during operation, it is recommended to install felt pads under heavy stationary devices and furniture legs.